
With simple components and countless design possibilities, beading is a perfect creative outlet for beginners looking to show off their artistic side. If you’re new to beading, don’t be intimidated. Our guide on how to bead for beginners will walk you through the essential steps to get started. With this detailed beading tutorial for beginners and a bit of practice, you can enjoy your beading journey to the fullest.
How to Bead for Beginners: Choose A Basic Jewelry Project
The first step in learning how to bead for beginners is selecting a suitable project. Beading offers a wide array of possibilities, ranging from delicate keychains to intricate bracelets and necklaces.
For beginners, it’s recommended to begin with relatively simple projects like bracelets and necklaces. These projects allow you to familiarize yourself with the basic techniques and build your confidence before tackling more complex designs.
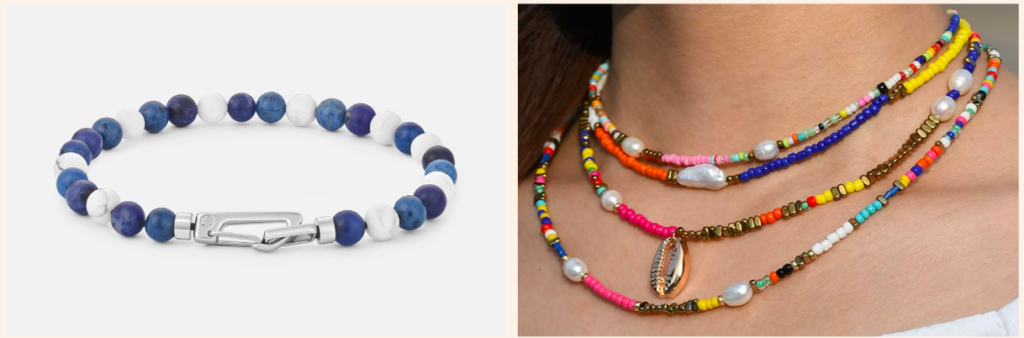
Beaded Bracelet
Bracelets offer an excellent starting point due to their limited length and simplicity. You can experiment with various bead patterns, colors, and sizes while still maintaining a manageable project size.
This allows you to familiarize yourself with the basic tools and techniques without feeling overwhelmed. As you progress, you can experiment with bead patterns, color combinations, and even incorporate various clasps and closures.
You will be able to creatively improvise on basic designs and add a personalized touch to your bracelets.
Beaded Necklace
Creating a beaded necklace is also an excellent introduction to the art of beading, but it provides a slightly more intricate challenge. Beaded necklaces introduce the concept of bead arrangement and spacing over a larger area. Nevertheless, with the help of many useful jewelry making kits and online tutorials available, you can find step-by-step instructions that will guide you through the process.
When starting with necklace projects, it’s advisable to focus on technique rather than length. Begin with shorter designs to become comfortable with bead stringing and spacing. As you gain confidence, you can gradually transition to crafting longer necklaces.
How to Bead for Beginners: Prepare The Right Tools
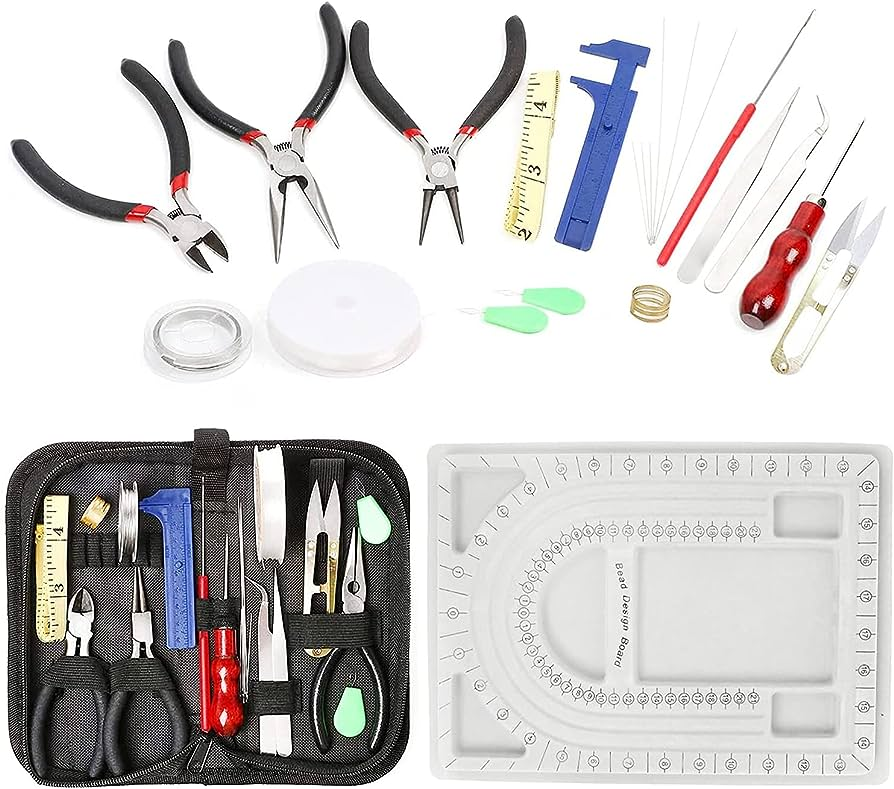
Selecting the appropriate tools is the next step toward mastering the art of beading. Investing in high-quality, specialized tools can make a significant difference in your crafting experience and the final result of your jewelry piece. Even for beginners, working with proper tools can make the process smoother and more enjoyable.
Here’s a list of must-have tools that will set you up for success:
- Wire Cutters: These are essential for cutting wires, cords, and chains to the desired length without damaging the materials.
- Round-Nose Pliers: These pliers have rounded tips that are perfect for creating loops, curves, and bends in wires, making them ideal for earrings and intricate designs.
- Flat-Nose Pliers: These pliers have flat jaws, making them useful for holding and bending flat components and opening jump rings.
- Beading Cord: Different jewelry pieces require different types of cord, such as nylon, silk, or leather. Choose the right cord based on the weight and style of your project.
- Assorted Clasps: Clasps are essential for securing your jewelry and ensuring it stays in place when worn. Choose clasps that match the style and size of your piece.
- Crimping Tool and Crimp Beads: If your project involves using wire, crimp beads and a crimping tool are necessary for attaching clasps securely.
- Memory Wire: This type of wire holds its shape, making it ideal for creating adjustable bracelets and chokers.
- Tape Measure: Accurate measurements are crucial in jewelry making. A tape measure helps ensure your pieces have the desired length.
- Adhesive: Some projects may require adhesive for securing knots or attaching certain elements to your jewelry piece.
Using the right tools not only makes the process easier but also enhances the quality of your jewelry. While it may be tempting to improvise with tools you have on hand, investing in good-quality tools right from the beginning will save you time, frustration, and potential mistakes.
How to Bead for Beginners: Choose The Right Beads
Selecting the appropriate beads is an important step in the beading process, especially for beginners. The type of beads you choose will significantly impact the final appearance of your jewelry or craft. Consider the following factors when choosing beads:
Bead Size
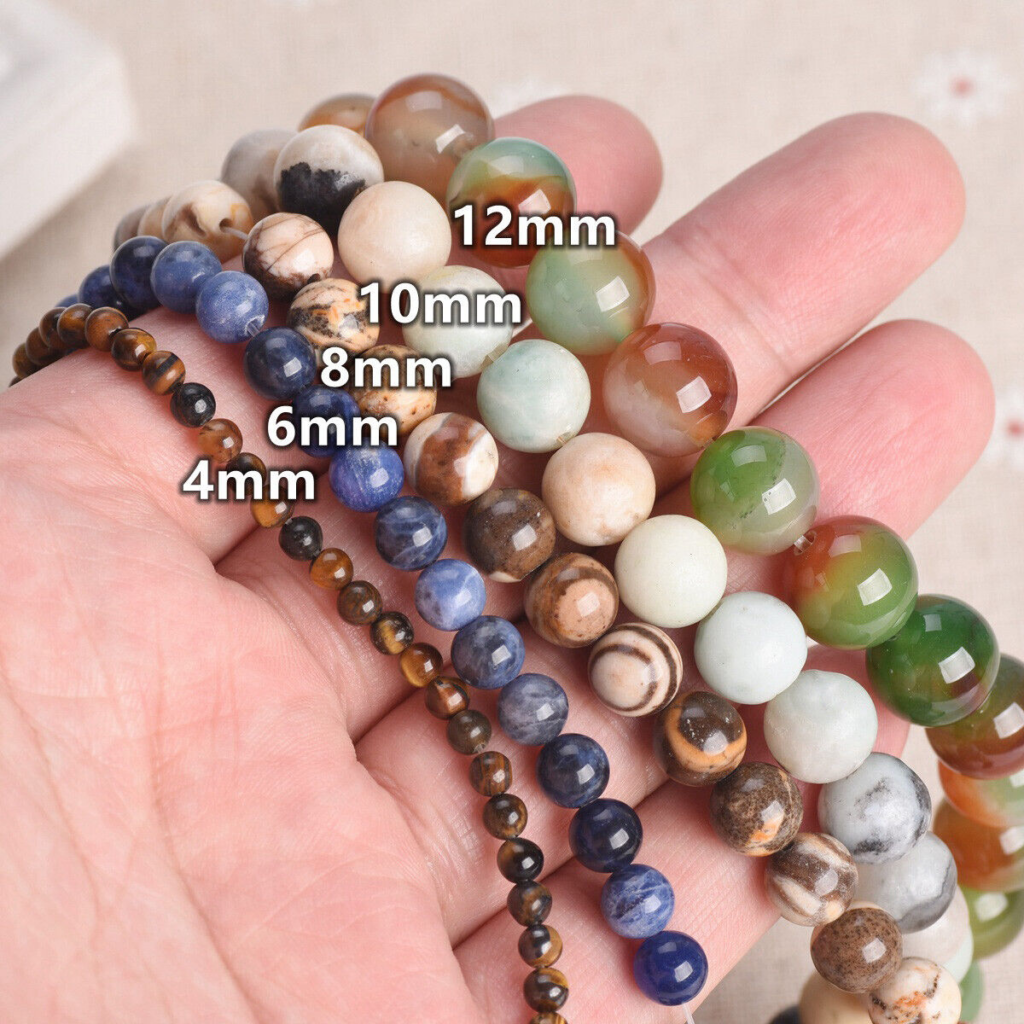
Beads come in a variety of sizes, typically measured in millimeters (mm). The size you choose depends on the style and purpose of your jewelry.
- 10 mm to 14 mm: Larger beads fall into this range and are perfect for creating bold and trendy statement pieces. These beads add a touch of drama to your jewelry and are often used as focal points in designs.
- 6 mm to 8 mm: Medium-sized beads are versatile and commonly used for crafting necklaces and bracelets. They strike a balance between subtlety and presence.
- 3 mm to 4 mm: These tiny beads act as accent pieces when placed alongside larger beads. They add texture and detail to your designs.
As a beginner, it’s advisable to start with beads sized 4 mm, 6 mm, and 8 mm. These sizes are suitable for a wide range of projects and techniques, allowing you to experiment and learn without limitations.
Bead Material
The material of the beads you select plays a significant role in the aesthetics and durability of your finished piece. For beginners, it’s recommended to start with affordable and versatile bead materials such as glass and wood. You can easily find them from online jewelry making vendors like Beadaholique or Fire Mountain Gems.
Glass beads come in an array of colors, shapes, and finishes, making them suitable for a wide range of projects. Wood beads offer a natural and rustic charm, making them perfect for bohemian and earthy designs.
If you’re looking to elevate your projects and create more intricate pieces, you might consider using gemstones or crystals. These materials add a touch of elegance and luxury to your jewelry. Gemstone beads, with their unique patterns and colors, can be a focal point in your creations. Crystals, on the other hand, add sparkle and glamour to any design.
As a beginner, it’s wise to start with a mix of glass, wood, and pearl beads. These beads are versatile and can be used in various projects, from bracelets to necklaces. Opt for neutral colors that can easily complement different styles and outfits. As you become more comfortable with the basic techniques, you can gradually introduce more vibrant colors and experiment with crystals and gemstones.
How to Bead for Beginners: Basic Beading Techniques
Now that you’ve gathered your materials, it’s time to delve into basic beading techniques. Beading involves various methods, and mastering these fundamentals will set the foundation for your creative journey. Let’s explore how to bead for beginners using some key techniques:
Bead Stringing
Bead stringing is the most straightforward type of beading technique for beginners. It involves threading beads onto a chosen stringing material, such as nylon thread, cord, or wire. This technique is perfect for crafting necklaces, bracelets, earrings, and even keychains.
The success of bead stringing hinges on selecting the right thread or wire. Choosing a weak thread can result in breaks, distorted shapes, or twisting. Experiment with various wires to identify the best fit for your project.
Let’s walk through the bead stringing technique step by step:
- Preparing Your Thread
- Determine Length: Measure the length of your beading wire using a tape measure. Leave a few extra inches to tie knots or attach clasps. If creating a bracelet, measure the circumference of your wrist for accurate sizing.
- Cutting the Thread: Use wire cutters to cut the thread about 3 inches longer than the desired length.
- Stringing the Beads
- Start Stringing: Begin adding beads to the string, one at a time. Ensure the first bead is at least 1 inch away from the end to prevent it from falling off. Maintain the planned pattern by adding beads sequentially.
- Check Length: Continuously check the length of your jewelry by draping it around the intended body part. Adjust the number of beads accordingly.
- Securing the Piece: Once satisfied with the pattern and length, secure the piece. Tie the ends together with a tight knot.
- Creating a Knot: To create a knot, fold the left end of the thread over itself to form a loop. Pass the right end of the thread through the loop and pull it down. Next, guide the right end over the left loop and then under the top part of the loop. Tighten all four ends to secure the knot and even the tension.
- Applying Adhesive: Strengthen the knot by applying a small amount of adhesive. This ensures the knot remains secure.
- Final Touch: After the glue dries, trim the excess thread. Your jewelry piece is now complete.
By following these steps, you’ve successfully created your first beaded project using the bead stringing technique. This straightforward approach is an excellent starting point for beginners seeking to explore the world of beading.
Bead Weaving
Bead weaving involves using thread to weave together seed beads, creating intricate patterns and shapes. One popular off-loom bead weaving technique is peyote stitch, which has been used for centuries to create beautiful beadwork. There are several stitches you can learn, but three fundamental stitches stand out. Let’s take a look at these step by step beading patterns for beginners.
- Flat Even-Count Peyote
The peyote stitch, also known as the gourd stitch, is a versatile weaving technique used to create flat patterns. Here’s how it works:
- Start the First Row: Thread an even number of beads, and create a foundation row by stitching back through the beads.
- Add Subsequent Rows: Stitch beads in an alternating pattern, aligning them with the beads in the previous row. The beads will interlock, creating a woven effect.
- Create Patterns: By using different colored beads in specific arrangements, you can create intricate patterns and designs.
- Right Angle Weave
Right angle weave (RAW) is another versatile technique that can be used to create both flat and three-dimensional beadwork. It involves stitching beads together at right angles to form interconnected units.
- Start with Base Beads: Begin by stringing four beads and creating a square or rectangular shape.
- Stitching: Add more beads, stitching them at right angles to the base beads. This creates a mesh-like structure that can be shaped as desired.
- Versatility: Right angle weave can be used to create elaborate jewelry components and embellishments.
- Brick Stitch
The brick stitch is a stacking technique that resembles bricks in a wall. It’s based on the ladder stitch and is perfect for creating fringe elements and intricate designs.
- Create the Ladder: Start by creating a ladder of beads by stitching back and forth.
- Stack the Beads: Stitch rows of beads on the sides of the ladder, stacking them like bricks. This creates a cascading effect.
- Variation: Brick stitch allows for adding different lengths of fringe or creating dimensional shapes.
Bead Wirework
Bead wirework is a technique that involves creating structured and expressive jewelry pieces using firmer single strands of wire. This technique eliminates the need for advanced tools and can be used to make bracelets, tiaras, beaded decorations, and even chainmaille work. The key to successful bead wirework lies in choosing the right type of wire and following proper execution steps. Here’s how to master this technique:
- Preparing the Wire:
- Measure and cut: Determine the desired length for your jewelry piece and add about 1 inch. Cut the wire using heavy-duty cutters.
- Create a loop: Use round-nose pliers to create a small loop at one end of the wire. Twist the wire around the top of the pliers to form the loop, and then remove the pliers while pinching the loop to make it smaller if needed.
- Beading the Wire
- String beads: Begin adding beads to the wire until about ½ an inch of wire remains at the end. Opt for smaller and medium-sized beads as chunkier beads might not fit well with the wire.
- Form another loop: Pinch the other end of the wire using round-nose pliers, then wrap the wire around the pliers to create a loop. Pinch the loop to make it slightly smaller after removing the pliers.
- Final touches: Your jewelry piece is now ready to wear! The looped ends act as attachment points for clasps, jump rings, or other components.
Bottom Line
Learning how to bead for beginners is an exciting journey into the world of creativity and craftsmanship. Starting with simple beading projects like bracelets and necklaces is a good way to build your skills gradually while enjoying the crafting process.
Remember, patience and practice are your best companions. Be open to experimenting with different bead combinations, colors, and patterns. Don’t hesitate to seek help from online jewelry making classes, books, and fellow beaders. Each piece you create will be a testament to your growing expertise and a reflection of your unique artistic expression.


